There's a new Ubuntu VM based on Edgy Eft available from VMware's site. I 've been using Edgy Eft a lot and I really like the improvements to bootup time. Here's a link for direct download:
Download
Wednesday, January 31, 2007
Saturday, January 27, 2007
Personal Backup Appliance Getting Started
This is a guide to using the Personal Backup Appliance to backup and restore your hard disk. The Personal Backup Appliance is an open source alternative to Ghost server. The Personal Backup Appliance, or PBA for short, is distributed as a VMware Virtual Appliance. Personal Backup Appliance can backup or restore your entire hard disk drive in just 3 steps. Personal Backup Appliance can be used in either PBA Mode or in Local Mode. In PBA Mode, the PBA Client is connected to a PBA Server and backups are written to the PBA Server. In Local Mode, no PBA Server is needed, but you do need to provide more information to mount a volume for storing backups. This walk-through will cover PBA Mode only.
PBA Mode: Server Setup
1. Download PBA 1.1.0
2. Unzip Personal-Backup-Appliance-1.1.0-vm.zip
3. Open the .vmx file using VMware Player or VMware Server.
After the VM boots up, you'll see a screen like this:
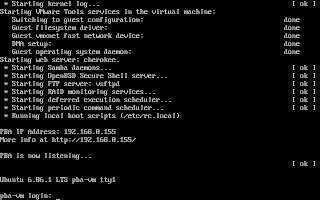 Please take note of the PBA's IP Address and the URL that's displayed. You'll need to use it later. Login. The login is vmware. The password is vmware.
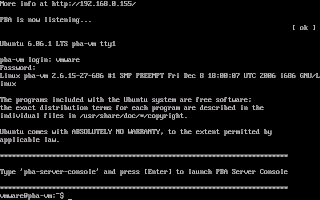 IMPORTANT: The first thing you should do after booting up is update to 1.1.0-1 using the patch. 1.1.0-1 fixes a bug in Local Mode. To patch to 1.1.0-1, run these commands on the PBA VM. This is a temporary requirement in lieu of the next release.
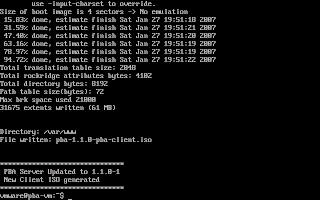 Your PBA Server is all setup and ready to go. The next time you use it, all you need to do is power it on.
PBA Server Console
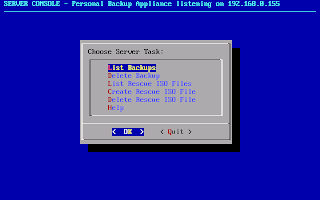
Version 1.1.0 has a new feature called the PBA Server Console which is started using the 'pba-server-console' command. The PBA Server Console is a management interface for deleting Backups and Creating a Rescue ISO file that you can burn onto a CD or DVD.
 PBA Mode: Client Setup
Client Download
First, download the PBA Client ISO from your PBA Server. Go to your PBA's web page using your PBA's URL. On this web page, you'll find instructions on how to download the PBA Client ISO and burn it onto CD.
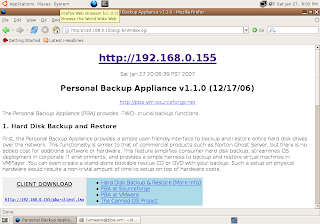
Here's what the web page will look like. See the download link for the Client ISO image. Download the ISO image and burn it onto a CD.
 Running the PBA Client
Once you have the client CD, boot it on a computer or VM on your network that you would like to backup. To boot from CD, you may need to change the boot order in your BIOS to boot from cdrom before the hard disk. After the client CD boots, you will be greeted with a prompt asking for the IP address of your Personal Backup Appliance.
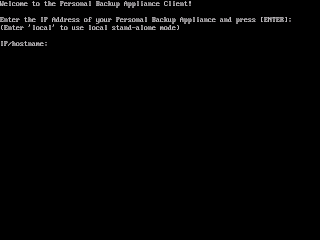 Enter in the IP address of your PBA Server, then press [Enter].
 PBA Mode: Backup Hard Disk
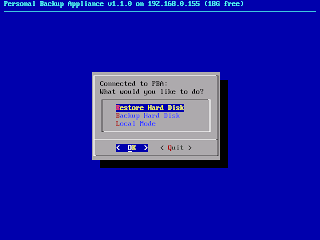
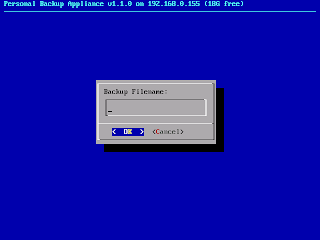
Use the arrow keys to select "Backup Hard Disk" and then press [Enter]. You'll see a prompt that looks like this. Type in a Backup Filename and press [Enter].
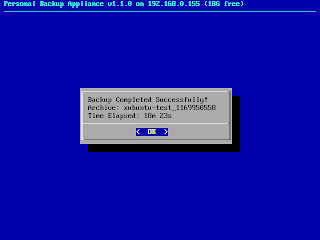
 The script will then chug along and backup your hard disk over the network to the PBA Server. The script will backup the MBR, the partition table, and sequentially backup each partition using partimage, ntfsclone, or dd. When the backup finishes, you'll get a screen that looks like this.
 PBA Mode: Restore Hard Disk
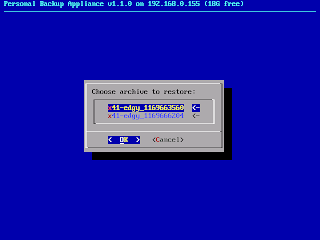
To restore a backup, just boot from the PBA Client CD, and select 'Restore Hard Disk' from the main menu. You'll see a menu of backup archives to restore. Use the arrow keys to choose the backup archive, and then press [Enter] to start the restore.
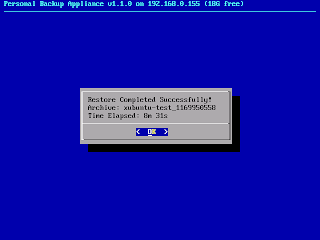
 The script will restore the MBR, the partition table, and sequentially restore each partition using partimage, ntfsclone, or dd. When the restore finishes, you'll get a screen that looks like this.
 Select Quit and power off the system when you're done.
Discuss PBA, Get Help, and Share Ideas on the Discussion Forums
Did you Digg this article?
PBA Mode: Server Setup
1. Download PBA 1.1.0
2. Unzip Personal-Backup-Appliance-1.1.0-vm.zip
3. Open the .vmx file using VMware Player or VMware Server.
After the VM boots up, you'll see a screen like this:
 Please take note of the PBA's IP Address and the URL that's displayed. You'll need to use it later. Login. The login is vmware. The password is vmware.
 IMPORTANT: The first thing you should do after booting up is update to 1.1.0-1 using the patch. 1.1.0-1 fixes a bug in Local Mode. To patch to 1.1.0-1, run these commands on the PBA VM. This is a temporary requirement in lieu of the next release.
When the patch process is finished, you'll see a screen like this:# cd /home/vmware
# wget http://downloads.sourceforge.net/pba-vm/pba-patch_to_1.1.0-1.zip
# unzip pba-patch_to_1.1.0-1.zip
# sh pba-patch_to_1.1.0-1.sh
 Your PBA Server is all setup and ready to go. The next time you use it, all you need to do is power it on.
PBA Server Console
Version 1.1.0 has a new feature called the PBA Server Console which is started using the 'pba-server-console' command. The PBA Server Console is a management interface for deleting Backups and Creating a Rescue ISO file that you can burn onto a CD or DVD.
 PBA Mode: Client Setup
Client Download
First, download the PBA Client ISO from your PBA Server. Go to your PBA's web page using your PBA's URL. On this web page, you'll find instructions on how to download the PBA Client ISO and burn it onto CD.
Here's what the web page will look like. See the download link for the Client ISO image. Download the ISO image and burn it onto a CD.
 Running the PBA Client
Once you have the client CD, boot it on a computer or VM on your network that you would like to backup. To boot from CD, you may need to change the boot order in your BIOS to boot from cdrom before the hard disk. After the client CD boots, you will be greeted with a prompt asking for the IP address of your Personal Backup Appliance.
 Enter in the IP address of your PBA Server, then press [Enter].
 PBA Mode: Backup Hard Disk
Use the arrow keys to select "Backup Hard Disk" and then press [Enter]. You'll see a prompt that looks like this. Type in a Backup Filename and press [Enter].
 The script will then chug along and backup your hard disk over the network to the PBA Server. The script will backup the MBR, the partition table, and sequentially backup each partition using partimage, ntfsclone, or dd. When the backup finishes, you'll get a screen that looks like this.
 PBA Mode: Restore Hard Disk
To restore a backup, just boot from the PBA Client CD, and select 'Restore Hard Disk' from the main menu. You'll see a menu of backup archives to restore. Use the arrow keys to choose the backup archive, and then press [Enter] to start the restore.
 The script will restore the MBR, the partition table, and sequentially restore each partition using partimage, ntfsclone, or dd. When the restore finishes, you'll get a screen that looks like this.
 Select Quit and power off the system when you're done.
Discuss PBA, Get Help, and Share Ideas on the Discussion Forums
Did you Digg this article?
Saturday, January 13, 2007
PBA Patch Release 1.1.0-1
There is bug with local mode in PBA version 1.1.0. It's fixed in patch release 1.1.0-1.
Details and instructions are here:
http://canned-os.hyperclock.com/forums/viewtopic.php?p=24#24
Details and instructions are here:
http://canned-os.hyperclock.com/forums/viewtopic.php?p=24#24
Thursday, January 04, 2007
Visit our New Discussion Forums
Happy New Year!
Please visit our new Discussion Forums for the the Canned OS Project (link on the right navbar).
The new format does require you to register, but managing my own Discussion Forums allows me to separate topics into categories and moderate discussions much more effectively, and over time, your posts and contributions will become the basis for a body of documentation for Personal Backup Appliance and our other releases.
I was finding it cumbersome to effectively respond to comments posted on this blog, postings on the PBA thread on the VMware site, and postings on the PBA sourceforge site, so I took down the sourceforge PBA forums, and created this single forum as the central place for help and discussion on releases from The Canned OS Project. I will still do my best to answer questions posted in these other areas, but you will get the fastest response on our Discussion Forums.
Subscribe to:
Comments (Atom)